Dumping Cartridges on the Commodore 64
Introduction
 Commercial Commodore 64 Software has been distributed in three kind of
media formats: 5.25 inch Floppy Disk, cassette tape and cartridges.
Recently archiving old 8bit Software has become a topic with magnetic
media dying after an approximated life span of 10-20 years. Emulators
of old systems on modern platforms allows for running the classic programs
on the latest whiz-bang-state-of-the-art-machine.
Commercial Commodore 64 Software has been distributed in three kind of
media formats: 5.25 inch Floppy Disk, cassette tape and cartridges.
Recently archiving old 8bit Software has become a topic with magnetic
media dying after an approximated life span of 10-20 years. Emulators
of old systems on modern platforms allows for running the classic programs
on the latest whiz-bang-state-of-the-art-machine.
While the conversion of floppy disks to .D64 disk images is very common,
and the .tap format for archiving cassette tapes is becoming more popular,
.crt cartridge files of classic cartridge games are very rare. This document
tries to give some advice for dumping cartridges to disk files. The
dumped files may be transferred to DOS or UNIX binary files using common
tools like STAR COMMANDER, and the included utility 'mcart' will convert
standard cartridge ROM dumps to emulator usable .crt files.
All information in this document is given 'as-is', and I can't being
hold responsible for any damage done to your machine. The module port
directly connects to the C64 bus, and you can seriously harm your computer
by manipulating it. Tell me of any problem - and success - you experience
by using this document! Please send suggestions and/or corrections to
markus@brenner.de
You always find the latest version of this package at:
markus.brenner.de
For easy dumping you should download the MDUMP tool from:
http://markus.brenner.de/binary/mdump.zip
1. A little theory
From the COMMODORE 64 Programmer's Reference Guide:
  Cartridge AUTO START

    The system provides for "auto-start" of the program in a Commodore 64
  Expansion Cartridge. The cartridge program is started if the first nine
  bytes of the cartridge ROM starting at location 32768 ($8000) contain
  specific data. The first two bytes must hold the Cold Start vector to be
  used by the cartridge program. The next two bytes at 32770 ($8002) must
  be the Warm Start vector used by the cartridge program. The next three
  bytes must be the letters, CBM, with bit 7 set in each letter. The last
  two bytes must be the digits "80" in PET ASCII.
NOTE: Autostarting works differently in Ultimax
mode cartridges: As those cartridges have their ROMH lying over $e000-$ffff,
they can simply overwrite the hardware vectors at $fffa-$ffff to point
to their initialization code.
  COMMODORE 64 MEMORY MAPS

    The following table lists the various memory configurations available
  on the COMMODORE 64, the states of the control lines which select each
  memory map, and the intended use of each map.
    The leftmost column of the table contains addresses in hexadecimal
  notation. The columns aside it introduce all possible memory
  configurations. The default mode is on the left, and the absolutely most
  rarely used Ultimax game console configuration is on the right. Each
  memory configuration column has one or more four-digit binary numbers as
  a title. The bits, from left to right, represent the state of the /LORAM,
  /HIRAM, /GAME and /EXROM lines, respectively. The bits whose state does
  not matter are marked with "X". For instance, when the Ultimax video game
  configuration is active (the /GAME line is shorted to ground, /EXROM kept
  high), the /LORAM and /HIRAM lines have no effect.


           LHGE   LHGE   LHGE   LHGE   LHGE   LHGE   LHGE   LHGE   LHGE

           1111   101X   1000   011X   001X   1110   0100   1100   XX01
  10000  default                00X0                             Ultimax
  -------------------------------------------------------------------------
   F000
          Kernal  RAM    RAM   Kernal  RAM   Kernal Kernal Kernal ROMH(*
   E000
  -------------------------------------------------------------------------
   D000    IO/C   IO/C  IO/RAM  IO/C   RAM    IO/C   IO/C   IO/C   I/O
  -------------------------------------------------------------------------
   C000    RAM    RAM    RAM    RAM    RAM    RAM    RAM    RAM     -
  -------------------------------------------------------------------------
   B000
          BASIC   RAM    RAM    RAM    RAM   BASIC   ROMH   ROMH    -
   A000
  -------------------------------------------------------------------------
   9000
           RAM    RAM    RAM    RAM    RAM    ROML   RAM    ROML  ROML(*
   8000
  -------------------------------------------------------------------------
   7000

   6000
           RAM    RAM    RAM    RAM    RAM    RAM    RAM    RAM     -
   5000

   4000
  -------------------------------------------------------------------------
   3000

   2000    RAM    RAM    RAM    RAM    RAM    RAM    RAM    RAM     -

   1000
  -------------------------------------------------------------------------
   0000    RAM    RAM    RAM    RAM    RAM    RAM    RAM    RAM    RAM
  -------------------------------------------------------------------------

    *) Internal memory does not respond to write accesses to these areas.
As you can see from the table above, the Cartridge configurations with
either ROML, ROMH (or both) enabled all meddle with the GAME and EXROM
lines which can be controlled from the module port. You basically have
three cases:
Normal   8kB cartridge at $8000       (ROML):      GAME = 1, EXROM = 0
Normal  16kB cartridge at $8000/$a000 (ROML,ROMH): GAME = 0, EXROM = 0
Ultimax 16kB cartridge at $8000/$e000 (ROML,ROMH): GAME = 0, EXROM = 1
To dump a cartridge you first need to break out of the auto-start loop
the program goes into when the cartridge is entered. Normally doing a
RESET will just reset the module, but not getting you into BASIC mode.
To disable the auto-start you can either modify the KERNAL RESET routine
by using a patched KERNAL (like Speeddos does) or disable the GAME and
EXROM pins by installing a switch. Your next task is to start up a
monitor which will still work with the ROM areas at $8000-$a000 and
$a000-$c000 enabled. Now determine which memory areas the module
uses and save the cartridge data to disk using the monitor's save command.
IMPORTANT NOTE:
The Ultimax configuration blanks out most of the RAM and
has ROMH lying at a critical area of memory - you don't have access to
the KERNAL at $e000-$fff! Therefore the replacement KERNAL method won't work
with these kinds of cartridges (early Commodore carts, Freezers). For those
you must use the switch solution (see below for details).
The Ultimax mode poses another problem if you are going to use a switch
for toggling between "cart disabled" and "normal" mode: For a fraction of
a second, when the switch change states, you don't have defined EXROM and
GAME lines. This can lead to Ultimax configuration being enabled for a
short time, which is unsecure if the computer isn't in a 'save' state.
So during switching you need to make sure the computer runs in a save
memory area ($0000-$1000 RAM) and interrupts are disabled.
2. Module Port switch
This chapter describes how to install a switch enabling you to turn on/off
the cartridge EXROM and GAME lines mapping the cartridge ROM areas over the
RAM banks in normal operation. For maximal flexibility use a 3 way 2 pole
switch (ON-OFF-ON).
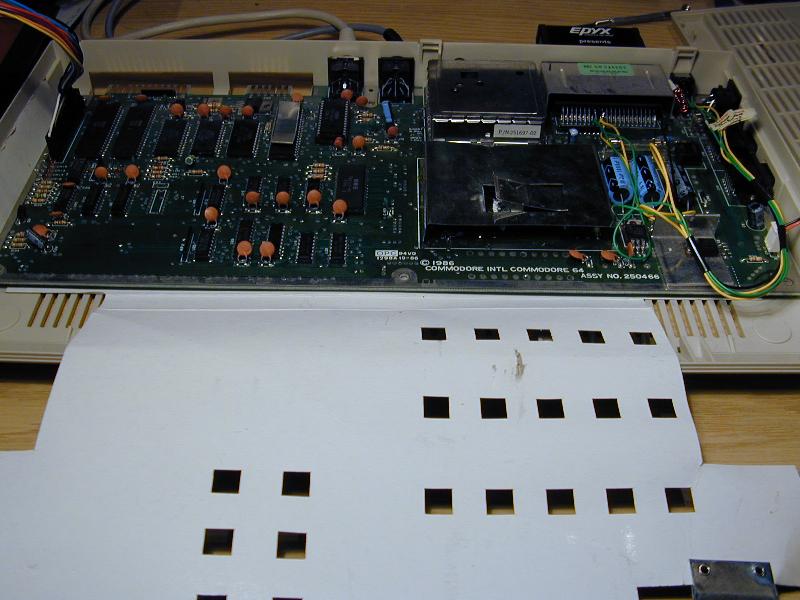
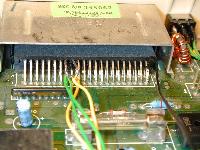
Disconnect your C64 from the power supply. Open up your machine by removing
the screws from the bottom. The guts of your commie will look something like
this:

Looking on the back of the C64 the cartridge port looks like this:
                 2 2 2 1 1 1 1 1 1 1 1 1 1
                 2 1 0 9 8 7 6 5 4 3 2 1 0 9 8 7 6 5 4 3 2 1
             +---*-*-*-*-*-*-*-*-*-*-*-*-*-*-*-*-*-*-*-*-*-*---+
             |                                                 |
             +---*-*-*-*-*-*-*-*-*-*-*-*-*-*-*-*-*-*-*-*-*-*---+
                 Z Y X W V U T S R P N M L K J H F E D C B A
The important pins for now are:
| NAME | PIN | DESCRIPTION
| | /GAME | 8 | active low ls ttl input
|
| /EXROM | 9 | active low ls ttl input
|
| GND | 22 | System ground (use for dumping ULTIMAX carts)
|
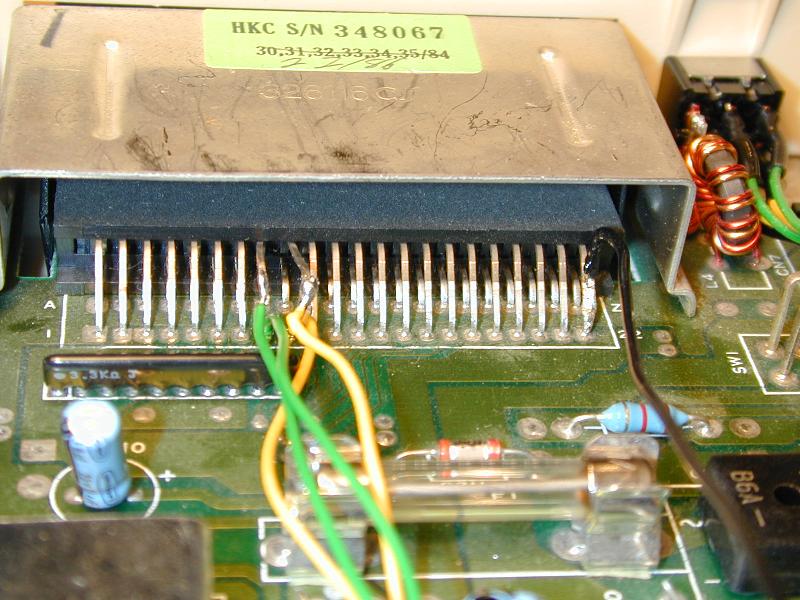
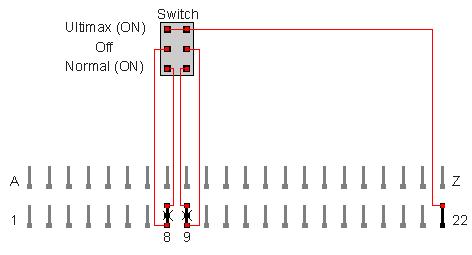
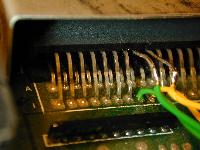
The switch has to go between the C64 PCB and the connector pins. Open up your
C64, and remove the screws holding the PCB to the lower casing. Have a look
at the module connector: The pins are numbered A-Z and 1-22 on the PCB.
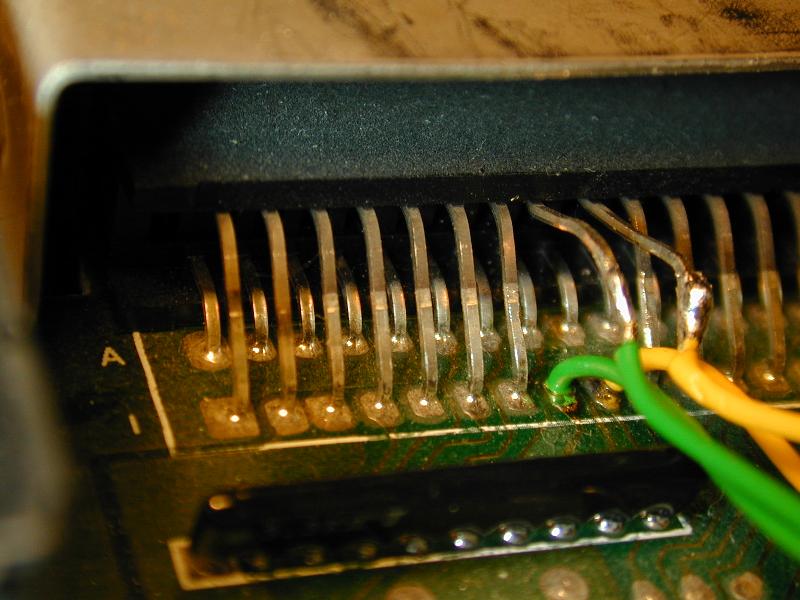
Unsolder the pins 8 and 9 and pull out the connector pins of the unsoldered
pin holes. Now solder two wires each to the PCB and to the connector stubs.
Solder a third wire to the GND pin (22).
Note that on my motherboard (pictures below) the pins are actually labelled
1-22 and A-Z, so you shouldn't really be able to make a mistake.
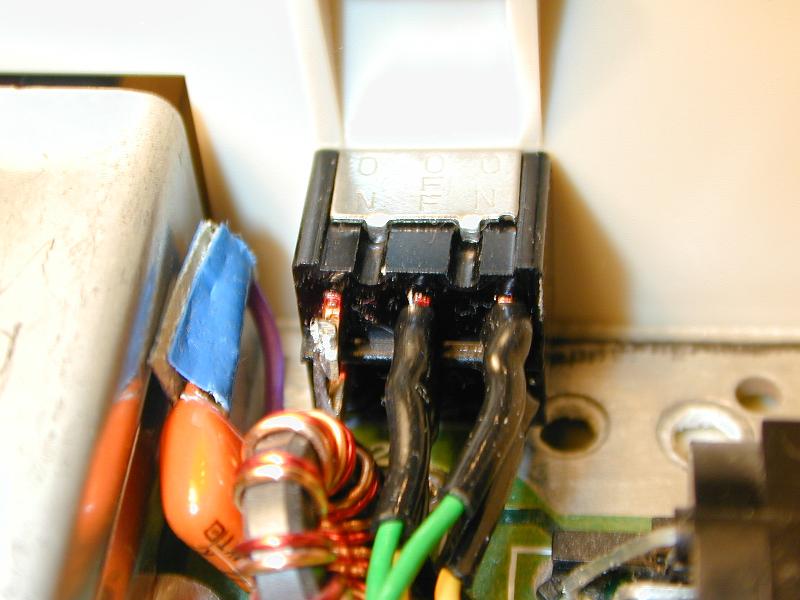
Inbetween each pair of wires goes your switch:
- Position 1 (ON) of the switch needs to connect cartridge port and PCB to
  the normal connection. This is your standard mode to play the games.

- Position 2 (OFF) leaves both PCB pins unconnected, like if no cartridge is
  inserted.

- Position 3 (ON) connects the PCB GAME and EXROM lines to GND. This
  configuration is used to dump 'ULTIMAX' mode cartridges.

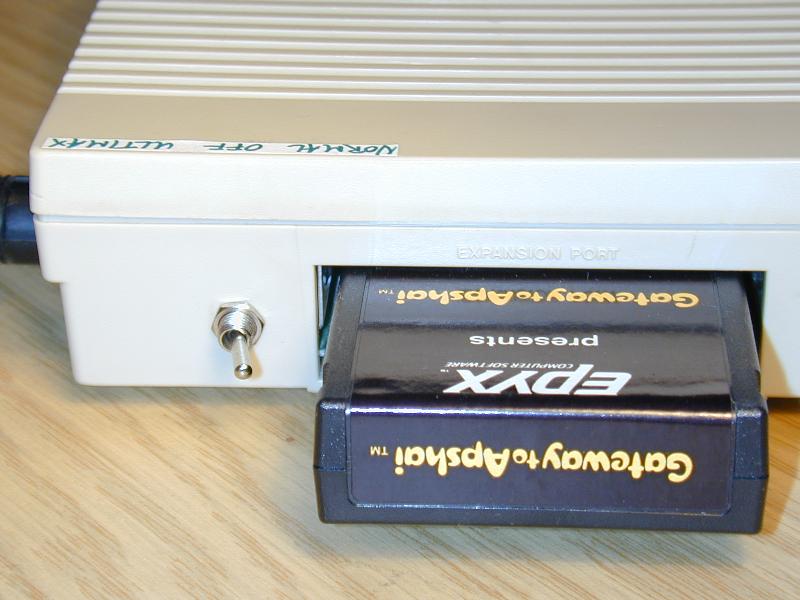
Drill a hole in the housing for the switch if you want to install it
permanently and mount the switch. Now assemble everything again and you're
ready for cartridge dumping!
1) Turn off C64. Insert Cartridge. Turn on the machine again. The cartridge
   should now auto-start up. If you just get the usual power-on screen throw
   your cartridge switch and do a RESET again. If you still don't have the
   cartridge running something went wrong with your switch installation.

2) Throw the cartridge switch to the 'open' position. Do a RESET. You
   should get the standard blue power-on Screen.

3) LOAD MDUMP from the disk drive you want the ROM dump to be saved to.
   RUN mdump and enter the cartridge name. You will be prompted to press
   'SPACE' and toggle your switch

4) Press 'SPACE' and toggle the switch WHILE THE SCREEN IS FLASHING to
   'normal configuration'. A busy wait loop during the flashing with
   interrupts disabled makes sure the computer won't crash during switching.

5) You will be prompted to insert the save disk. The area $8000-$bfff will
   be saved to disk.
ULTIMAX mode cartridges require a slightly different treatment!
You can figure out if your cartridge uses ULTIMAX mode by setting your
switch to 'ULTIMAX' dump configuration and doing a RESET. If the game
DOES NOT run it is an ULTIMAX cart!
For dumping that kind of cartridges you proceed like above until step 3.
Instead of switching to 'normal mode' in step 4 you need to switch to
'ULTIMAX dumping mode'.
By using 'ULTIMAX dumping mode' you pull both the GAME and EXROM lines to
GROUND instead of restoring the original cartridge configuration. This way
you trick the computer into believing it is using standard 16kB cartridge
mode, and you will be able to see the ROMH block (normally in Ultimax mode
at $e000-$ffff) at $a000-$bfff.
3. Multi-Cartridge Expansion module
Cartridge Expansion modules usually come with a switch to toggle between
different cartridge slots without having to remove the cartridges to
change them. You can use such a module to dump a cartridge.
IMPORTANT:
This method will *NOT* work on ULTIMAX configuration cartridges!
1) Turn off C64. Insert Cartridge into slot 1. Leave slot 2 empty. Power on
   machine and see that Cartridge is running by selecting the appropriate
   switch position.

2) Change the switch position to a free slot. Do a RESET. You should get the
   standard blue power-on Screen.

3) LOAD MDUMP from the disk drive you want the ROM dump to be saved to.
   RUN mdump and enter the cartridge name. You will be prompted to press
   'SPACE' and toggle your switch

4) Press 'SPACE' and toggle the switch WHILE THE SCREEN IS FLASHING to
   slot 1 with the inserted cartridge.
   A busy wait loop during the flashing with interrupts disabled makes sure
   the computer won't crash during switching.

5) You will be prompted to insert the save disk. The area $8000-$bfff will
   be saved to disk.
4. Alternate KERNAL
A patched KERNAL allows you to pass
over the standard RESET routine and thus suppress the auto-starting of
a CBM80 cartridge. In the following paragraphs I explain dumping carts
with Speeddos, but you should be able to figure the process out for other
KERNAL replacements with similar functionality.
IMPORTANT:
This method will *NOT* work on ULTIMAX configuration cartridges!
Speeddos is a KERNAL replacement which on the computer side replaces the
standard KERNAL ROM with an eprom containing an altered version of the
$e000-$ffff routines. If you have an access to an eprom burner you should
be able to find the Speeddos ROMs on the internet and replacing the ROM
by an eprom using an adapter socket. The KERNAL ROM is a 24 pin DIL chip,
in my C64 Rev. C type brown breadbox-style it is the middle one of three
shorter chips on the left side of the PCB. (901227-03)
Speeddos has a very useful feature we will use for dumping the cartridge:
If you hold the C= key while doing a RESET the machine won't go through its
normal RESET routine but will rather go into a built-in monitor program. All
you need to do now is to save the memory region the cartridge is using and
you are done!
1) Turn off C64. Insert Cartridge. Turn on the machine again. The cartridge
should now auto-start up.
2) Hold down the C= key while doing a RESET. Your machine should
go into a monitor display, showing the $0801 page of memory.
3) Enter M8000 - after switching to small letters with you should
be able to read CBM80 at $8004 in the ASCII representation of the monitor.
Now enter MA000 - If the first bytes are $94 $e3 $7b $e3 and you can read
CBMBASIC in the ASCII display your cartridge memory range is $8000-$a000.
If the $a000 area differs the cartridge range is $8000-$c000.
4) Insert your save disk, now enter
S"cartname" 8000 c000
and press to save the cartridge memory to disk. If the cartridge
only uses $8000-$a000 memory range use:
S"cartname" 8000 a000
Appendix A: Installing a RESET button
You can install a RESET button either on the User port or on the serial
(floppy) port. It's up to you if you solder the wires actually to the PCB
and install a button switch in the housing or install the button on a
connector you either mount on the User port or on the Serial Port (at the
1541)
You install the RESET button between pin 1 and pin 3 on the User port.
The User Port pinout as seen from the back:
                                             1 1 1
                           1 2 3 4 5 6 7 8 9 0 1 2
                        +--@-@-@-@-@-@-@-@-@-@-@-@--+
                        |                           |
                        +--@-@-@-@-@-@-@-@-@-@-@-@--+
                           A B C D E F H J K L M N


                            PORT PIN DESCRIPTION
  +-----------+-----------+-----------------------------------------------+
  |    PIN    |           |                                               |
  +-----------+DESCRIPTION|                     NOTES                     |
  | TOP SIDE  |           |                                               |
  +-----------+-----------+-----------------------------------------------+
  |     1     |  GROUND   |                                               |
  |     2     |   +5V     |  (100 mA MAX.)                                |
  |     3     |  RESET    |  By grounding this pin, the Commodore 64 will |
  |           |           |  do a COLD START, resetting completely. The   |
  |           |           |  pointers to a BASIC program will be reset,   |
  +-----------+-----------+-----------------------------------------------+
To install the RESET button on the serial bus connect pin 2 and 6 over
the button:
  Serial I/O
                                                       ++ ++
  +-------+----------------------+                    / +-+ \
  |  Pin  |         Type         |                   /5     1\
  +-------+----------------------+                  +  O   O  +
  |   1   |  /SERIAL SRQ IN      |                  |    6    |
  |   2   |  GND                 |                  |    O    |
  |   3   |  SERIAL ATN OUT      |                  |         |
  |   4   |  SERIAL CLK IN/OUT   |                  +  O   O  +
  |   5   |  SERIAL DATA IN/OUT  |                   \4  O  2/
  |   6   |  /RESET              |                    \  3  /
  +-------+----------------------+                     +---+
Appendix B: Kernal Replacement Socket Adapter
PENDING:
I'm not finished formatting this section to HTML, so bear with me...
To replace your standard KERNAL by a Speeddos KERNAL you need to build an
adapter to replace the 24 ROM DIL chip by a 28 DIL 2764 8kB eprom.
Material: 24 Pin DIL
28 Pin DIL
some wire
KERNAL ROM Speeddos eprom
24 DIL 28 DIL
1-11 ---------- 3-13
12 ---------- 14+20
13-17 ---------- 15-19
18 ---------- 23
19-20 ---------- 21-22
21 ---------- 2
22-23 ---------- 24-25
24 ---------- 26+27+28+1
ﻌﺥﺥﺥﺥﺥﺥﺥﺥﺥﺟ
ﺏ ﻌﺥﺥﺥﺥﺥﺟ ﺏ
ﭺﺥﺑ1 28ﺣﺥﺑ
ﻌﺥﺥﺥﺥﺥﺟ cﺑ2 27ﺣﺥﺑ
*ﺑ1 24ﺣd *ﺑ3 26ﺣdﻋ
*ﺑ2 23ﺣ* *ﺑ4 25ﺣ*
*ﺑ3 22ﺣ* *ﺑ5 24ﺣ*
*ﺑ4 21ﺣc *ﺑ6 23ﺣb
*ﺑ5 20ﺣ* *ﺑ7 22ﺣ*
*ﺑ6 19ﺣ* *ﺑ8 21ﺣ*
*ﺑ7 18ﺣb *ﺑ9 20ﺣa
*ﺑ8 17ﺣ* *ﺑ10 19ﺣ*
*ﺑ9 16ﺣ* *ﺑ11 18ﺣ*
*ﺑ10 15ﺣ* *ﺑ12 17ﺣ*
*ﺑ11 14ﺣ* *ﺑ13 16ﺣ*
aﺑ12 13ﺣ* aﺑ14 15ﺣ*
ﭺﺥﺥﺥﺥﺥﻋ ﭺﺥﺥﺥﺥﺥﻋ
Appendix C: References
COMMODORE 64 PROGRAMMER'S REFERENCE GUIDE,
Commodore Business Machines (1982) available in etext form from
Project 64.
CRT Cartridge
Images documentation compiled by Peter Schepers.
Appendix D: Tools
mcart, tool for converting cartridge dumps to emulator CRT files.
mdump dumping tool for normal cartridges. (C64 tool)
ardump, dumping tool for Action Replay and Action Cartridge. (C64 tool). Does this work?
dpow dumping tool for "Power Play" and "Fun Play" cartridges. (C64 tool)
dmagic dumping tool for Commodore's Magic Desk cartridge. (C64 tool)
docean dumping tool for Ocean cartridges. (C64 tool)
dgs dumping tool for Commodore "C64GS" Game System and
System 3 cartridges (Last Ninja Remix, Myth). (C64 tool)
dsg dumping tool for Commodore "SUPER GAMES" cartridge. (C64 tool)
epyxdump dumping tool for Epyx Fast Load cartridge. (C64 tool, no switch
necessary)
fc1dump, dumping tool for Final Cartridge I. (C64 tool). Does this work?
fc3dump, dumping tool for Final Cartridge III. (C64 tool, instructions
included: dfc3.txt)
dzaxxon, dumping tool for Zaxxon and Super Zaxxon by SEGA (C64 tool).
For Warpspeed use the ordinary mdump tool.
 Commercial Commodore 64 Software has been distributed in three kind of
media formats: 5.25 inch Floppy Disk, cassette tape and cartridges.
Recently archiving old 8bit Software has become a topic with magnetic
media dying after an approximated life span of 10-20 years. Emulators
of old systems on modern platforms allows for running the classic programs
on the latest whiz-bang-state-of-the-art-machine.
Commercial Commodore 64 Software has been distributed in three kind of
media formats: 5.25 inch Floppy Disk, cassette tape and cartridges.
Recently archiving old 8bit Software has become a topic with magnetic
media dying after an approximated life span of 10-20 years. Emulators
of old systems on modern platforms allows for running the classic programs
on the latest whiz-bang-state-of-the-art-machine.